Contour Like a Pro: Men’s Step-by-Step Guide to Sculpting Your Face

Contouring for men involves using strategic shading and highlighting with makeup to enhance facial features like the jawline, cheekbones, and nose, creating a more sculpted and defined appearance through a step-by-step process.
Want to sharpen your jawline and boost your confidence? This guide shows you how to contour your face like a pro: a step-by-step guide for men, even if you’re a complete beginner.
What is Contouring and Why Should Men Do It?
Contouring is a makeup technique that uses shades darker than your skin tone to create shadows and define areas of your face. It’s not about changing who you are, but enhancing your existing features.
While often associated with women’s makeup, contouring can be a powerful tool for men looking to define their jawline, slim their nose, or accentuate their cheekbones. It’s about subtly enhancing your natural masculinity.
Benefits of Contouring for Men
Contouring offers several benefits for men looking to enhance their appearance. Here are a few key advantages:
- Enhanced Jawline: Creates a sharper, more defined jawline for a stronger profile.
- Slimmer Nose: Makes a wide nose appear slimmer and more proportionate to the face.
- Accentuated Cheekbones: Adds depth and definition to the cheekbones, resulting in a more sculpted look.
Ultimately, contouring is about confidence. It’s about feeling good in your skin and presenting the best version of yourself to the world. It’s a subtle art that can make a big difference.
Essential Tools and Products
Before you dive into contouring, you’ll need the right tools and products. Using the correct items will make the process much smoother and the result more natural.
Investing in quality tools and products is a worthwhile investment. They’ll last longer and provide a more professional finish. Let’s explore what you need.
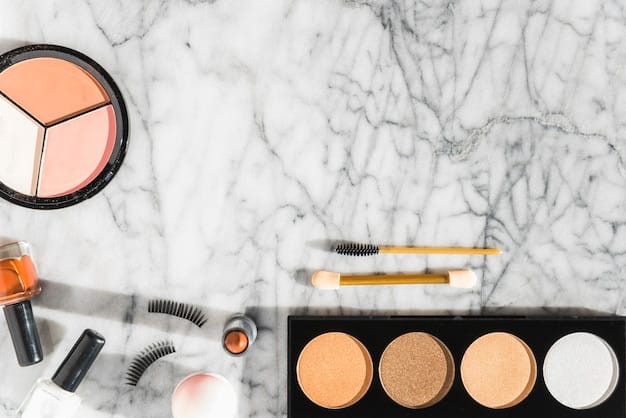
Contour Products
- Contour Stick: A cream-based product that’s easy to blend and buildable. Look for one that’s 2-3 shades darker than your skin tone.
- Contour Powder: Ideal for setting cream contours or for those with oily skin. Choose a matte finish to mimic natural shadows.
- Bronzer: A warmer tone than contour, used to add warmth and dimension to the face. Use it sparingly to avoid looking orange.
Tools
- Blending Brush: A fluffy, angled brush is perfect for blending cream and powder contours seamlessly.
- Highlighting Brush: A smaller, tapered brush for precise application of highlighter.
- Spoolie Brush: Useful for grooming eyebrows, ensuring a clean and polished look to complement the contoured face.
Preparing Your Face for Contouring
A good base is crucial for a flawless contour. Start with a clean and moisturized face to ensure the products blend smoothly and last longer.
Think of your face as a canvas. Preparing it correctly sets the stage for a masterpiece. Let’s get started with the preparation process.
Step-by-Step Preparation
- Cleanse: Wash your face with a gentle cleanser to remove any dirt, oil, or impurities.
- Moisturize: Apply a lightweight, non-greasy moisturizer to hydrate your skin.
- Prime (Optional): Use a primer to create a smooth surface and help your makeup stay in place.
Proper preparation is often overlooked, but it’s the key to a natural and long-lasting contour. Take your time and don’t skip these steps.
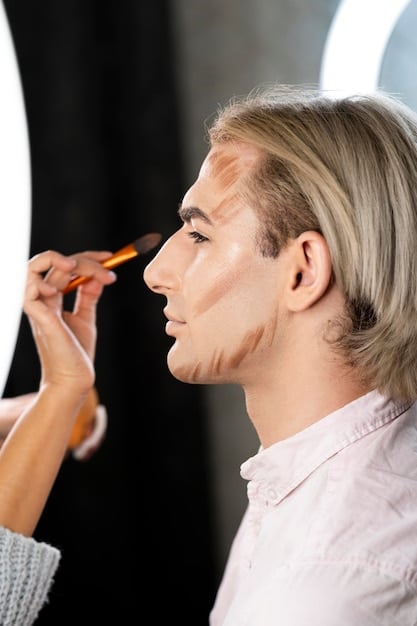
The Basic Contouring Technique: Step-by-Step
Now that your face is prepped, it’s time to start contouring! This step-by-step guide will walk you through the basic technique for achieving a sculpted look.
Remember, practice makes perfect. Don’t be discouraged if you don’t get it right the first time. Keep experimenting until you find what works best for you.
Step 1: Apply Contour
Using your contour stick or powder, apply the product to the following areas:
- Cheekbones: Start from the ear and blend towards the corner of your mouth, stopping about two fingers away.
- Jawline: Apply along your jawline to create a more defined appearance.
- Temples: Apply along your temples to narrow your forehead.
Step 2: Blend, Blend, Blend
Blending is crucial to avoid harsh lines. Use your blending brush to soften the edges of the contour, creating a seamless transition between the contour and your skin.
- Circular Motions: Use circular motions to blend the product into your skin.
- Light Pressure: Apply light pressure to avoid moving the product around too much.
- Check in Natural Light: Check your blending in natural light to ensure there are no noticeable lines.
Highlighting to Enhance Your Contour
Highlighting is the yin to contouring’s yang. It brings light to the high points of your face, enhancing the sculpted effect created by the contour.
Highlighting isn’t about adding shimmer, it’s about strategically placing light to accentuate your best features. Let’s explore where to apply highlighter.
Where to Apply Highlighter
- Cheekbones: Apply highlighter above your contour, on the high points of your cheekbones.
- Bridge of the Nose: Apply a thin line of highlighter down the bridge of your nose to make it appear longer and slimmer.
- Cupid’s Bow: Apply a small amount of highlighter to your cupid’s bow to accentuate your lips.
Remember, less is more when it comes to highlighter. Start with a small amount and build up the intensity as needed. You want a subtle glow, not a disco ball.
Common Mistakes and How to Avoid Them
Contouring can be tricky, and it’s easy to make mistakes along the way. Knowing the common pitfalls can help you achieve a flawless, natural look.
Don’t worry if you make mistakes. Everyone does when they’re learning something new. The key is to learn from them and keep improving. Let’s look at some common errors.
Mistakes to Avoid
- Using the Wrong Shade: Choosing a contour that’s too dark can look unnatural. Select a shade that’s only 2-3 shades darker than your skin tone.
- Harsh Lines: Failing to blend properly can result in harsh, noticeable lines. Always blend thoroughly.
- Too Much Product: Applying too much product can make your contour look heavy and unnatural. Start with a small amount and build up as needed.
- Skipping Preparation: Neglecting to cleanse and moisturize your skin can affect the way your makeup blends and lasts.
By avoiding these common mistakes, you’ll be well on your way to mastering the art of contouring and achieving a natural, sculpted look.
| Key Point | Brief Description |
|---|---|
| ✨ Product Selection | Choosing the right contour stick or powder shade is crucial for a natural look. |
| 🧽 Blending is Key | Seamlessly blending contour and highlighter avoids harsh lines for a subtle effect. |
| 💧 Skin Prep | Proper cleansing and moisturizing ensure smooth makeup application and longevity. |
| 👨🦰 Application areas | Focus application on cheekbones, jawline, and temples for a sculpted appearance. |
FAQ
▼
Choose a contour shade 2-3 shades darker than your natural skin tone. For fair skin, opt for cool-toned browns. For medium skin, try neutral browns, and for dark skin, choose deep, rich browns.
▼
While bronzer can add warmth and dimension, it’s not a direct substitute for contour. Contour mimics shadows, so it should be matte and cool-toned, while bronzer is warmer and may contain shimmer.
▼
Use light pressure and circular motions with a blending brush. Avoid dragging the product across your face. Ensure the edges are softened, and there are no harsh lines.
▼
Cream contours are often easier to blend, making them a good choice for beginners. They are also buildable, allowing for more control. Powder contours work great for oily skin.
▼
Start with a primer, set your cream contour with a similar shade of powder contour, and finish with a setting spray. This helps to lock in the makeup and prolong its wear.
Conclusion
Mastering the art of contouring can significantly enhance your facial features, providing a more sculpted and defined look. By following this step-by-step guide and avoiding common mistakes, you’ll be well on your way to achieving a professional-level contour that boosts your confidence and elevates your appearance.


